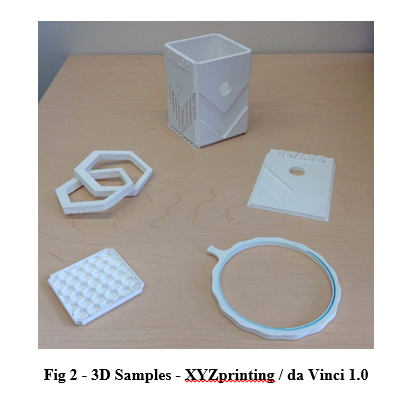
3D printing or additive manufacturing is the process of making a three-dimensional object from a 3D model or other electronic data source primarily through additive processes in which successive layers of material are laid down under computer control. A 3D printer is a type of industrial robot. The da Vinci 1.0 from XYZprinting is the device used for this project. It can build objects as large as 20 cm x 20 cm x 20 cm, using FFF (Fused Filament Fabrication) technology.
From modelling to Printing
What was once reserved for science fiction is now real and affordable. Home Depot has recently announced that they will be selling 3D printers. Printing in 3D is about to hit the consumer market. The da Vinci V.1 is less expensive than an iPad. The 3D printing industry is in its early stages and will need people to become educated on how to use software to design objects. Learning graphical language is essential to understanding how the Computer Aided Drafting software operates. From multi-view orthogonal projections to functional dimensioning, technical drafting skills are going to be as important as literacy and numeracy for the next generations.
The first 3D Printer at SWLSB
The AEVT department wrote a grant proposal to purchase a 3D printer for students in Joliette High School, and it was approved. It is aimed for the Work Oriented Training Path (WOTP) program to study building structures and forms. The funds were granted from the COPA des Laurentides table to support VT initiatives in the community.
In the context of the diversification of pathways available to students, the WOTP provides employment opportunities to young people who have learning difficulties in the academic subjects and enables them to continue their education in different contexts with adapted pedagogy to obtain an official certificate of skills training that prepares them for the job market.
There are bridges between the Prework Training and the DEP (Diploma of Vocational Studies). The aim of this project is to encourage in-training students, leading to the exercise of a semi-skilled trade to explore DEP options and consider programs in the building sector.
Exploration activities will consist of MAKING solid objects by modelling and printing in architectural forms to stimulate interest in the building trades and encourage perseverance.
Making connections
The job market provides a number of scientific and technological challenges, and students enrolled in Prework Training should be aware of them. The Technological and Scientific Experimentation Program offers a set of resources, comprising concepts, strategies, techniques and attitudes in different learning and evaluation situations. What this project is aiming at is to make a connection between WOTP curriculum subjects, technological and scientific experimentation, and the preparation for the job market.
The process of making 3D objects is basically three steps;
Step 1 - Design/Modelling
Step 2 - 3D Printing
Step 3 - Raft removal (if required)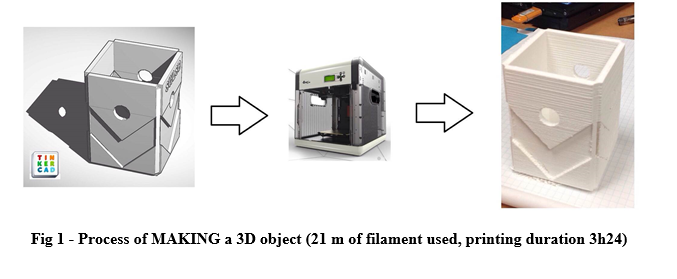
Step 1 - Design/Modelling
Drawing digitally can be done using a variety of software; in this case TINKERCAD was used because it is simple, intuitive and can save 3D models in STL format. STereoLithography (STL) file format has become the industry standard when it comes to 3D printing. It is widely used for rapid prototyping and computer-aided manufacturing. STL files describe only the surface geometry of a three-dimensional object without any representation of color, texture or other common CAD model attributes.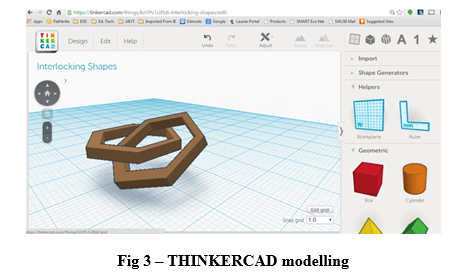
Step 2 - 3D Printing
Once the STL file is created by the CAD software, it is just a matter of sending the data down to the 3D printer. A user friendly interface will guide the user to adjust the print density of the object(s). The default print setting on the da Vinci 1.0 printer will create the internal structure of the object based on honeycomb structures. The supportive structures are printed according to the object features. Support is used to create structural strength and ensure that the model does not collapse during the printing process.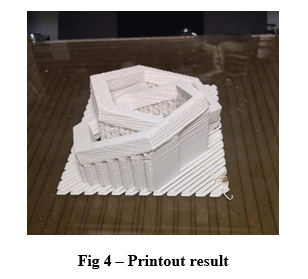
Step 3 - Raft removal
Printing thinner and longer objects requires more attention due to the shapes physical instability. Rafts create stability and can be removed after the object has been printed.Sometimes, the printer will use more filament for the rafts than for the actual object being printed.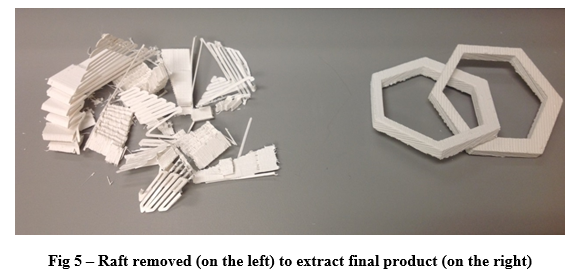
3D printing teaching/learning activities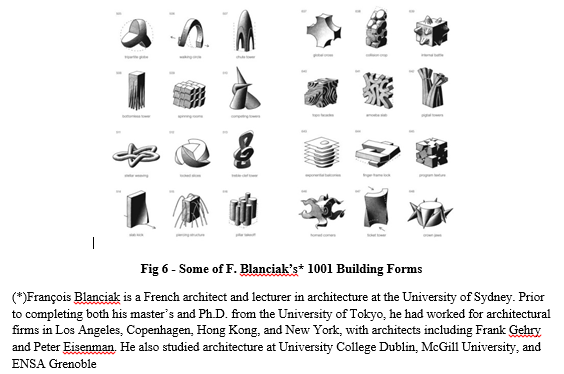
The NMC Horizon Report identified 3D printing as a technology that will have a major impact on STEM teaching. It said that 3D printing is being viewed as a way to achieve more hands-on learning in the humanities, allowing students to explore cultural history through replicas of real-world artifacts.
For high school students, project based instructional strategy is favored as a deeper learning approach. A toolkit for project based learning, including resources to support teachers and schools in implementing PBL is available on the Digital Learning Day website.
It would be an interesting challenge to ask students to print one of Blanciaks 1001 Building Forms in 3D. The project would consist of modelling one of the building forms with a CAD software and printing it in 3D to stimulate interest in the building trades and encourage perseverance.
3D printers open new possibilities for learning, promote problem-solving skills and, most importantly, create excitement.

 In The Latest Issue:Latest Issue:
- A Bittersweet Farewell
- The new Laval Aquatic Co...
- The End of an Era:
Articles
Calendar
Virtual- ANNUAL TEACHER APPRECIATION CONTEST
- APPUI LAVAL
- ARTS & CULTURE
- CAMPS
- CAR GUIDE
- CCIL
- CENTENNIAL ACADEMY
- CHARITY FUNDRAISING
- CITYTV
- COSMODÔME
- COMMUNITY CONNECTIONS
- COVER STORY
- DINA DIMITRATOS
- ÉCOLE SUPÉRIEURE DE BALLET DU QUÉBEC
- EDITORIALS
- ÉDUCALOI
- EDUCATION
- EMPLOYMENT & ENTREPRENEURSHIP
- FÊTE DE LA FAMILLE
- FÊTE DU QUARTIER SAINT-BRUNO
- FAMILIES
- FESTIVAL LAVAL LAUGHS
- FÊTE DE QUARTIER VAL-DES-BRISES
- FINANCES
- GLI CUMBARE
- GROUPE RENO-EXPERT
- HEALTH & WELL-BEING
- 30 MINUTE HIT
- ANXIETY
- CHILDREN`S HEALTH & WELLNESS
- CLOSE AID
- DENTAL WELLNESS
- EXTREME EVOLUTION SPORTS CENTRE
- FONDATION CITÉ DE LA SANTÉ
- GENERAL
- HEARING HEALTH
- MESSAGES FROM THE HEALTH AGENCY OF CANADA
- MENTAL HEALTH
- SEXUALITY
- SOCIAL INTEGRATION
- SPECIAL NEEDS
- TEENS
- THE NUTRITION CORNER
- THE NUTRITION CORNER - RECIPES
- VACATION DESTINATION
- WOMEN'S FITNESS
- WOMEN'S HEALTH
- HILTON MONTREAL/LAVAL
- HOME & GARDEN
- INTERNATIONAL WOMEN'S DAY
- JAGUAR LAVAL
- LAVAL À VÉLO
- LAVAL FAMILIES TV SHOW
- LAVAL FAMILIES MAGAZINE CARES
- LAVAL URBAN IN NATURE
- LE PARCOURS DES HÉROS
- LES PETITS GOURMETS DANS MA COUR
- LEON'S FURNITURE
- LEONARDO DA VINCI CENTRE
- LFM PREMIERES
- LIFE BALANCE
- M.P. PROFILE
- MISS EDGAR'S AND MISS CRAMP'S SCHOOL
- MISSING CHILDREN'S NETWORK
- NETFOLIE
- NORTH STAR ACADEMY LAVAL
- OUTFRONT MEDIA
- PASSION SOCCER
- PARC DE LA RIVIÈRE-DES-MILLE-ÎLES
- PÂTISSERIE ST-MARTIN
- PIZZERIA LÌOLÀ
- PLACE BELL
- PORTRAITS OF YOUR MNA'S
- ROCKET DE LAVAL
- SACRED HEART SCHOOL
- SCOTIA BANK
- SHERATON LAVAL HOTEL
- SOCIÉTÉ ALZHEIMER LAVAL
- STATION 55
- STL
- SUBARU DE LAVAL
- TECHNOLOGY
- TEDXLAVAL
- TODAY`S LAURENTIANS AND LANAUDIÈRE
- TODAY`S LAVAL
- WARNER MUSIC
- THIS ISSUE
- MOST RECENT
Magazine

3D Printing at Sir Wilfrid Laurier School Board
How does 3D printing work?


 BY: Tami Belhadj
 Issue 12
Tami Belhadj | Author
Tami is a Pedagogical Consultant at Sir Wilfrid Laurier School Board. He is an education technology/evidence based learning advocate. A Strong believer in authentic and experiential teaching-learning supported with ePortfolio/micro-credentialing in a multimodal environment.
FOLLOW TAMI BELHADJ ON: TwitterLinkedIn READ MORE BY TAMI BELHADJ
Articles ~e 105,7 Rythme FM 4 chemins Annual Teacher Appreciation Contest Appui Laval Arts & Culture Ballet Eddy Toussaint Camps THIS ISSUE MORE...
CONTESTS Enter our contests
CONTESTS Enter our contests
CALENDAR
Events & Activities
COMMUNITY Posts Events
PUBLICATIONS Our Magazine Family Resource Directory
LFM BUSINESS NETWORK Learn more
COUPONS Click to save!
COMMUNITY Posts Events
PUBLICATIONS Our Magazine Family Resource Directory
LFM BUSINESS NETWORK Learn more
COUPONS Click to save!
SUBSCRIPTIONS
Subscribe to the magazine
Un-Subscribe
E-NEWSLETTER Subscribe to our E-newsletter Un-Subscribe
WRITE FOR US Guidelines & Submissions
POLLS Vote today!
E-NEWSLETTER Subscribe to our E-newsletter Un-Subscribe
WRITE FOR US Guidelines & Submissions
POLLS Vote today!
ADVERTISERS
How to & Media guide
Pay your LFM invoice
SUGGESTIONS Reader's Survey Suggest a Listing
LFM About Us Our Mission Giving Back Contact Us
SUGGESTIONS Reader's Survey Suggest a Listing
LFM About Us Our Mission Giving Back Contact Us
 PICK-UP LOCATIONS
Get a copy of LFM!
PICK-UP LOCATIONS
Get a copy of LFM!
TERMS & CONDITIONS Privacy | Terms
ISSN (ONLINE) 2291-1677
ISSN (PRINT) 2291-1677
Website by ZENxDESIGN
Tweet
Share